Mastering how to illustrate a monkey step by step becomes significantly simpler when you initially disregard the fur. Commence with circles, ovals, a soft U-shaped snout, and a curly tail. Those basic shapes accomplish most of the work before you infuse color or texture.
This guide starts with an adorable cartoon monkey suitable for kids and novices, then transitions into a more lifelike monkey perched on a branch. Maintain a gentle touch on your pencil, feel free to utilize an eraser, and view the initial sketch as a blueprint rather than a completed illustration.
Essential Insights
- This manual demonstrates a straightforward, step-by-step method to illustrate a charming cartoon monkey sitting and grinning, utilizing basic shapes such as circles, ovals, and curved lines.
- The only instruments required are a pencil, eraser, black pen or marker, and colored pencils or crayons to finalize your artwork.
- The tutorial progresses gradually from the monkey’s head and facial features to the body, limbs, legs, and curly tail, making it ideal for newcomers.
- An extra segment details how to create a more lifelike monkey posture for those eager to enhance their abilities.
- The FAQ section at the end addresses frequent inquiries regarding drawing different poses, styles, and monkey species from the roughly 260 varieties found globally.
Begin with Basic Monkey Shapes
Before incorporating details, pay attention to the larger shapes: a round head, a smaller body, two wide ears, a snout, and a tail that curls like a loose question mark. When I outline animals, I assess the silhouette first. If the contour reads as a monkey, the fur and facial features are much simpler to add.
The most beneficial construction lines are the vertical center line and the eye line. Sketch them lightly enough so you can erase them later. They serve a purpose; they prevent the eyes, nose, and smile from drifting to one side.
How to Illustrate a Monkey Step by Step
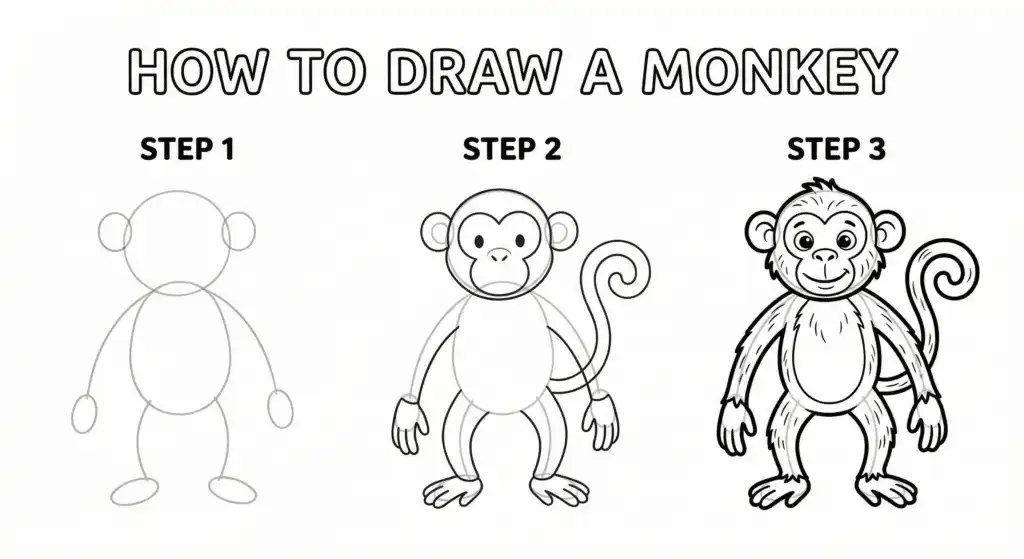
To draw a monkey step by step, outline a large circle for the head, add a smaller rounded body beneath, position the ears high on each side, then construct the snout with a broad U shape. Place the eyes on a light horizontal guideline, sketch a small nose and smile within the snout, and then add the arms, legs, belly patch, and curled tail. Once the outline is satisfactory, erase the construction lines, darken the final outline, and color the fur using warm browns and a lighter shade for the face.

For children, I recommend pausing after each shape to compare left and right. Are the ears roughly the same size? Is the snout aligned? Is the tail clearly attached to the body? Small checks like these can avert most common beginner errors.
Monkey Drawing Inspiration and References

Once the fundamental monkey feels secure, utilize references to alter the pose, emotion, or species. A capuchin features a different facial structure than a baboon, and a swinging monkey necessitates a much clearer arm motion than a seated one.
Here are some valuable resources to explore:
- Printable step-by-step sheets intended for kids, presenting numbered steps and blank spaces to sketch alongside the guide.
- Nature photography of monkeys in treetops, which can inspire more lifelike or dynamic poses in future illustrations.
- Video tutorials with narrated instructions, some of which have attracted over 130,000 views from learners globally.
- Art community forums where you can share your creations and receive feedback from fellow artists.
For practice subjects after finishing this tutorial, consider these entertaining variations:
- A seated monkey clutching a banana.
- A monkey hanging upside down from a branch.
- A baby monkey clinging to its parent.
- A humorous dancing monkey with arms raised.
- A monkey swinging through jungle vines.
Reference photos are especially helpful when you aim to capture the distinctive traits of various species, from the compact physiques of capuchins to the muscular forms of baboons.
How to Illustrate a Simple Cartoon Monkey Step by Step
This is the primary kid-friendly version: a front-facing monkey with a round head, large ears, short body, and a cheerful expression. It’s straightforward enough for a classroom art project yet still beneficial if you’re learning animal proportions.
Begin with a light touch. A 2B pencil is ideal as it provides soft lines without needing to press hard. You can enhance the clean outline later with a black pen or marker.

Step 1 – Outline the Head and Face Guidelines

Commence by illustrating a large, faint pencil circle at the center of your paper for the monkey’s head. On standard A4 paper, target approximately 8-10 cm in width, which provides ample space for detailing.
Subsequently, introduce a faint vertical guideline extending directly down the midsection of the circle. Then, sketch a horizontal guideline through the center, forming a cross shape within the head.
Though these light construction lines may seem mundane, they are essential. They assist you in evenly placing the eyes and snout, ensuring that the monkey gazes directly at the viewer. If your sketch lines feel overly pronounced, practice these pencil drawing techniques before proceeding.
Maintain these lines sketched very lightly. You will erase them later upon completing your drawing.
Step 2 – Incorporate the Face (Muzzle) Form

Sketch a broad “U” shape in the lower half of the head circle to define the muzzle area. This forms the lighter-hued face mask typical of monkeys.
Align the top of the “U” so it touches or almost touches the horizontal guideline drawn earlier. The muzzle should encompass approximately the lower half of the face.
Soften the edges of your “U” shape to resemble a gentle oval instead of a sharp letter. This softer contour provides your monkey with a charming, friendly look that children adore.
Ensure the muzzle remains centered on the vertical guideline. This keeps your monkey’s face harmonious and directed towards the viewer.
Step 3 – Illustrate the Eyes, Nose, and Mouth

Position two medium-sized ovals for the eyes along the horizontal guideline, placing one on either side of the vertical line. Space them out evenly for a symmetric appearance.
Inside each eye, create smaller dark circles for the pupils. Leave a small white highlight in each pupil to give the eyes a glimmer and liveliness. This minute detail adds significant expression to your illustration.
For the nose, draw a small rounded triangle or oval in the center, right atop the muzzle form. Keep it simple and modest in size.
Form a smiling mouth by drawing a short vertical line downward from the nose, followed by two curved lines extending outward. Think of it as resembling a sideways “3” shape or a simple “W” turned to its side.
Optional: include tiny curved lines above the eyes for eyebrows. This is a subtle adjustment, but it alters the expression significantly: raised brows suggest surprise, lowered brows imply mischief, while soft brows keep the monkey appearing friendly.
Step 4 – Illustrate the Ears and Top of the Head
Sketch two large round ears on either side of the head circle, located slightly above the horizontal guideline. Monkey ears are distinctive features that set them apart from bears or dogs.

Each ear can be depicted as a “C” shape on the left side and a mirrored “C” shape on the right, directly connected to the head circle.
Add a smaller curve within each ear to represent the inner ear detail. This creates a slim rim around the edge, enhancing the depth of your drawing.
For added character, you might slightly flatten the very top of the head or introduce a tiny tuft of fur with three short spiky lines. This imparts personality to your monkey.
Step 5 – Sketch the Body Beneath the Head

Draw a smaller oval or rounded egg shape just below the head to form the monkey’s body. Allow it to slightly overlap with the lower section of the head circle.
Maintain the body at about half the height of the head. This proportion sustains the adorable, chibi-like aspect that renders cartoon monkeys so endearing. Actual monkey anatomy typically follows a 1:3 head-to-body ratio, but we are exaggerating for appeal here.
Utilize smooth, curved lines so the body appears soft, as if the monkey is seated and leaning slightly forward.
Add an inner oval in the belly region. This will transform into a lighter fur patch when you add color later, providing your monkey with greater visual intrigue.
Step 6 – Outline and Remove Guidelines
Once you are satisfied with your monkey sketch, trace the final lines using a darker pencil, black pen, or fine marker. Proceed slowly and meticulously to maintain smooth lines.

Allow any ink to dry completely prior to erasing. Then carefully eliminate all the faint guidelines and construction lines you sketched at the outset.
Think about enhancing the outer edges of the head, body, and tail a bit. This produces a sharp, professional cartoon appearance that is prominent on the page.
Be patient during this phase. Rushing can result in smudges or broken lines that are challenging to correct.
Step 7 – Color Your Monkey

Now it’s time for the enjoyable part. Utilize colored pencils, crayons, or markers to animate your monkey illustration.
Here’s a timeless color palette that works splendidly:
| Area | Recommended Color |
|---|---|
| Main fur | Medium brown |
| Face/muzzle | Light cream or beige |
| Inner ears | Light pink |
| Belly patch | Cream or tan |
| Cheeks | Soft pink |
Incorporate simple shading by applying a slightly darker brown beneath the head, alongside the lower parts of the arms, and below the tail. This adds depth without necessitating intricate techniques.
Feel free to play around with various colors. Purple monkeys, blue monkeys, or rainbow monkeys can be equally exciting for creative projects.
For another child-friendly creature shaped from circles and ovals, refer to this simple dog drawing tutorial as a quick practice sketch. It is particularly beneficial for paws, floppy ears, and basic facial expressions.
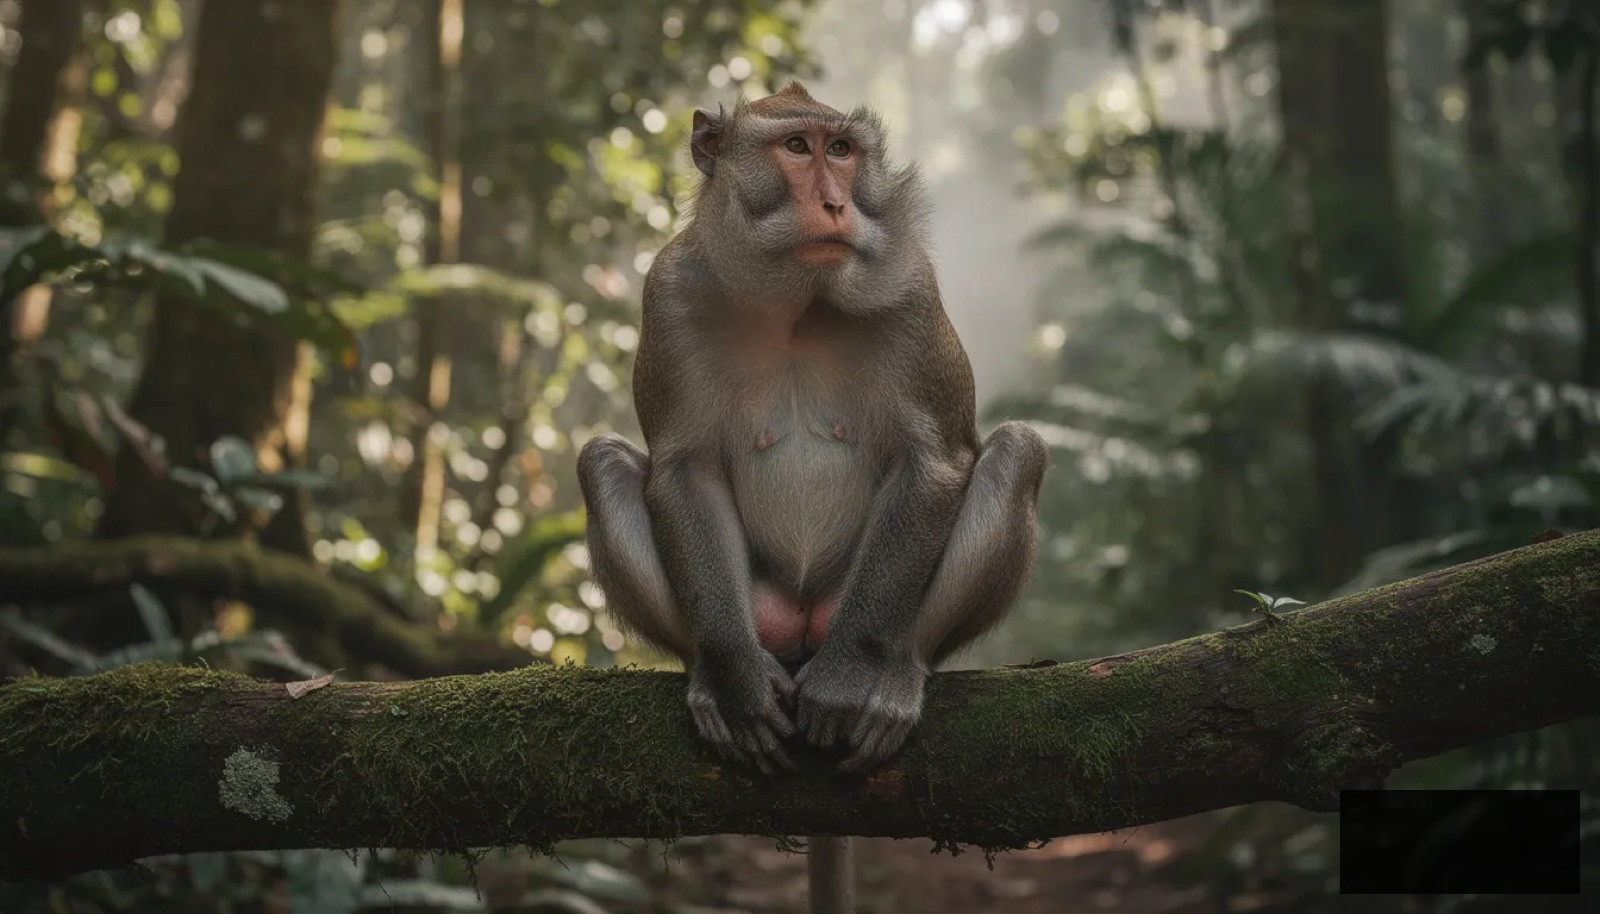
How to draw a more realistic monkey pose

Following the cartoon version, attempt drawing a monkey perched on a branch. The sketch still commences with basic shapes, but the proportions are less adorable and more realistic: longer arms, smaller head, bent legs, and a body that leans into the stance.
Employ circles, ovals, cylinders, and one prominent gesture line before outlining the fur. In academic drawing, this is the moment to decelerate and examine angles instead of estimating. The branch is also important since it provides the hands and feet with a believable surface to hold.

Keep a reference image close for this phase. Seek a monkey sitting on a branch so you can verify the arm length, hip angle, tail curve, and how the fingers grasp the wood.
Step 1 – Basic Shapes for Body and Branch

Draw a large oval for the ribcage area and a smaller oval for the hips. Arrange them so they slightly overlap and tilt forward, indicating a seated position.
Create a soft curved line connecting the centers of these ovals to outline the spine. This assists in understanding how the body curves and flows.
Incorporate a horizontal or slightly tilted rectangle below the body to signify a tree branch. This gives your monkey something to rest on and anchors the composition.
Maintain all lines light and relaxed at this stage. You’ll be making modifications as you develop the figure.
Step 2 – Add Head, Limbs, and Tail Guides

Position a medium circle above the ribcage oval to represent the head. Link it to the body with a brief neck line.
Incorporate basic stick lines for limbs. For authentic monkey proportions, the arms should be significantly longer than the legs—this is one of the prominent traits that distinguishes primates from other species.
Arrange the hands clutching the branch and the feet either resting on or suspended from it. This establishes a natural, credible stance.
Sketch a lengthy, curved line from the hip region for the tail, allowing it to partially wrap around or over the branch for stability.
Step 3 – Create Volume on Arms, Legs, and Head

Encase basic cylinders or rounded tube forms around the stick lines of the limbs. This imparts thickness and a three-dimensional shape to your arms and legs.
Render the hands and feet as flat paddle shapes, with elongated, narrow ovals for fingers and toes that are clutching the branch. Monkey fingers are relatively long when compared to human ratios.
Enhance the head by adding a smaller muzzle shape extending from the face circle. Indicate where the eyes and ears will be located.
Now is the moment to modify proportions. Verify if the arms appear lengthy enough, if the knees bend naturally, and if the overall stance looks balanced.
Step 4 – Polish the Face, Fur, and Branch

Incorporate more realistic facial features including a subtle brow ridge, a slightly protruding muzzle with visible nostrils, and focused eyes gazing in a specific direction.
Utilize brief, directional strokes to imply fur along the back, chest, and limbs. It’s unnecessary to depict each individual hair—just enough to suggest texture without overworking the illustration.
Add texture to the branch with uneven edges and a few short bark lines to give it the appearance of real wood instead of a smooth cylinder.
Eliminate unnecessary construction lines and darken your final outlines to finalize this more authentic monkey pose.
Tips, tricks, and common blunders when sketching monkeys
Most monkey illustrations encounter issues in a few recurring areas: small ears, short arms, a flat muzzle, or a tail that appears glued on. Address those first before enhancing more fur or color.
Helpful Suggestions:
- Always commence with simple forms before adding intricacies—circles for heads, ovals for bodies
- Position facial features lower on the face for optimal cuteness in cartoon styles
- Refer to real monkey images to grasp anatomy and proportions
- Practice sketching ears individually until you can create them adeptly
- Experiment with various expressions by altering eyebrow positions and mouth shapes
- Avoid pressing too firmly with your pencil during the initial sketching phase
Common Errors and Corrections:
| Error | Causes | Quick Solution |
|---|---|---|
| Monkey resembles a bear | Ears too small, muzzle too broad | Enlarge ears, create distinct face mask shape |
| Arms appear too short | Using human measurements | Extend arms beyond the body, longer than legs |
| Mouth positioned too close to nose | Insufficient muzzle space | Place mouth in lower third of the face area |
| Tail seems stiff | Drawing with straight lines | Add curves and spirals, tapering from thick to thin |
| Face appears flat | Lacking the muzzle shape | Incorporate the inner oval/U shape for the face |
Avoid refining a weak sketch prematurely. If the monkey still resembles a bear, revisit the ears, muzzle, arm length, and tail curvature. Correcting those four aspects resolves more issues than additional shading.

Broaden your monkey drawings into comics, logos, and scenes
Once you're familiar with the fundamentals, you can incorporate monkeys into logos, comics, greeting cards, and fully illustrated scenes. The basic shapes you've mastered are tremendously adaptable.

Designing Distinct Characters:
Altering the shape of the eyes and the curvature of the mouth can reinvent your monkey into entirely new characters:
- Partially closed eyes alongside a slight smile = drowsy monkey
- Large eyes with elevated eyebrows = astonished monkey
- Squinted eyes paired with a grin = sly, naughty monkey
- Shut eyes with an expansive smile = cheerful, giggling monkey
Incorporating Backgrounds:
Basic backgrounds enhance your illustrations, making them more complete and engaging:
- Jungle foliage in various hues of green
- Dangling vines for the monkey to swing upon
- Bananas strewn about
- A platform in a treehouse
- Tropical blossoms in vivid shades
Designing Icons and Logos:
When creating icons, stickers, or logo drafts, streamline your monkey even further. Eliminate finer details, bolden lines, and concentrate on the most distinct characteristics: round head, large ears, and curled tail.
Comic Strip Concepts:
Consider developing brief comic strips featuring your monkey character undertaking simple tasks:
- Ascending a tree to grab a banana
- Swinging between vines
- Sharing fruit with a companion
- Making amusing faces at its reflection
- Acquiring a new skill
Comics enhance your ability to depict the same character from various perspectives and in different stances, significantly improving your overall drawing skills.

FAQ

Q: What is the simplest method to sketch a monkey for novices?
A: Begin with a circle for the head, a smaller oval for the torso, two circular ears, and a broad U shape for the snout. Place the eyes along a light guideline, followed by the arms, legs, belly patch, and curled tail. Keep the initial lines faint so that you can erase and modify them.
Q: How can I differentiate my monkey depiction from that of a bear or dog?
A: Emphasize the monkey's features: larger ears situated high on its head, a prominent snout or facial mask, elongated arms, and a noticeable tail. Bears typically possess smaller ears and bulkier bodies, while dogs have elongated snouts. If the outline displays rounded ears, extended arms, and a curled tail, onlookers will interpret it as a monkey more swiftly.
Q: What supplies are required for this monkey drawing guide?
A: A standard pencil, eraser, black pen or marker, and brown colored pencils or crayons will suffice. A 2B pencil is ideal for sketching due to its ability to create gentle construction lines, although any school pencil works. Utilize a marker only after ensuring the pencil sketch appears balanced.
Q: What age group is this monkey drawing guide appropriate for?
A: The cartoon monkey is ideal for children ages 6-12 and for absolute beginners of any age. Younger kids can cease after the basic outline and color it. Older children, teenagers, and adults can attempt the realistic branch pose to practice proportions, limb angles, and fur texture.
Q: How do I illustrate a monkey hanging from a branch?
A: Maintain the same head and body shapes, then adjust the pose so that the arms extend upward toward a branch. Lengthen the arms compared to the legs, curve the fingers over the branch similarly to hooks, and allow the tail to dangle or curl for stability. Keep the body slightly elongated to create the sense that it is being pulled by gravity.
Q: Can I apply these steps to depict chimpanzees or other monkey species?
A: Absolutely, but adapt the specifics of the species. Chimpanzees lack a visible tail and possess a more robust physique. Marmosets feature small faces and tufted ears. Spider monkeys require exceptionally long limbs and tails. Use this tutorial as a foundation, then refer to a reference image before modifying the ear size, muzzle length, body structure, and tail.
References
- Easy Peasy and Fun. (n.d.). How to Sketch a Monkey. Retrieved from https://www.easypeasyandfun.com/how-to-draw-a-monkey
- Tuts+ Design. (n.d.). How to Sketch a Monkey Step by Step. Retrieved from https://design.tutsplus.com/tutorials/how-to-draw-a-monkey-step-by-step–cms-29241
- wikiHow. (n.d.). How to Sketch a Monkey. Retrieved from https://www.wikihow.com/Draw-a-Monkey
- The Phoenix Comic. (n.d.). How to Illustrate Monkey. Retrieved from https://thephoenixcomic.co.uk/comic-club/video-drawing-tutorials/how-to-draw-monkey
- Reddit. (2022). How to Illustrate a Monkey. Retrieved from https://www.reddit.com/r/mildlyinfuriating/comments/zmsbmt/how_to_draw_a_monkey_draw_a_monkey
