My initial resin pour set sticky on one side, cloudier than anticipated on the opposite side, and featured a crater in the middle from a bubble I overlooked. The table I was crafting it for remains in the garage, draped with a cloth. I could have sanded and repoured. I chose not to.
That piece instructed me more than any tutorial I viewed prior to beginning. The bubble arose because I poured too quickly. The sticky area occurred because I neglected to scrape the edge of the mixing cup while combining the hardener. The cloudiness was due to moisture — I had been working near an open window in humid conditions without considering it.

This guide elaborates on how resin art genuinely operates, from the chemistry underpinning the material to the techniques that yield professional-grade outcomes. It features twelve project concepts spanning various skill levels, candid remarks on what can go awry at each phase, and the tools worth investing in compared to those you can forgo. No preface about self-expression. Merely the craft.
What Resin Art Truly Is: The Material and the Chemistry

Epoxy resin is a two-part system: Part A (the resin) and Part B (the hardener). When combined, they initiate a chemical reaction referred to as curing. The outcome, once the reaction concludes, is a hard, glossy, rigid solid. The ratio in which you blend them is crucial, which is why resin art has a higher failure rate compared to many craft projects: the chemistry doesn’t tolerate estimation.
Most art resins mix at a 1:1 ratio by volume (equal parts resin and hardener) or a 2:1 ratio (two parts resin to one part hardener). Some systems measure by weight rather than volume. Refer to your specific product. Employing a kitchen scale for weight-based systems is more precise than measuring cups for volume-based ones, although both are effective when done carefully.

If you already enjoy working with poured materials, this DIY candle making tutorial serves as an excellent complementary project for wax, scents, and container design.
Temperature significantly impacts cure time and final quality. Resin cures quicker in warm environments and slower in colder ones. Below approximately 18°C (65°F), the curing process slows to the point where bubbles that would typically rise and burst remain trapped as the resin thickens. The generally advised working temperature is 21–24°C (70–75°F). Warming your resin bottles in a basin of warm water for 5 to 10 minutes before mixing decreases viscosity and aids in the easier release of bubbles.

Types of Resin Employed in Art
Art epoxy resins are designed for thin layers and surface applications. They self-level, cure transparently, and are tailored for the color intensity and UV protection that artistic projects require. ArtResin and Entropy Resins Super Sap are examples of art-specific epoxies with low-VOC formulations.

Deep pour resins are formulated for casting thick layers (up to 2 inches or greater in a single pour) without the excessive heat generated by regular epoxy at such thickness. These cure more slowly, generally taking 48 to 72 hours instead of 24, and are the suitable option for river tables, thick coasters, and encapsulation projects.
UV resin cures swiftly under UV light instead of through a chemical reaction over time. It proves advantageous for small jewelry items and detailed work where you wish to cure one small area before adding the next. It is pricier per gram than two-part epoxy and not feasible for larger-scale projects.

Resin Type Quick Guide
- Art epoxy: slim surface pours, paintings, coasters, trays. Cure duration 24–72 hours. Deep pour epoxy: thick castings, river tables, encapsulated items. Cure duration 48–72+ hours. UV resin: small jewelry, layered detail work, repairs. Cure duration 30 seconds to 3 minutes under UV lamp.
Essential Tools: What You Really Need vs. What You Can Omit

Most resin starter kits contain items you won’t frequently use and exclude essentials you’ll require instantly. This list distinguishes them.

What You Require From the Start
- Nitrile gloves: Essential. Uncured resin is a skin irritant that may lead to allergic responses with repeated contact. Standard latex gloves are inadequate. Purchase nitrile in bulk.
- Silicone mat: Cured resin detaches easily from silicone. A silicone mat beneath your workspace simplifies cleanup and safeguards your work area. Resin does not peel off wood, fabric, or most plastics.
- Measuring cups with transparent volume scales: Correct ratio measurement is crucial for a successful pour. Inexpensive unmarked cups lead to the most frequent beginner mistake.
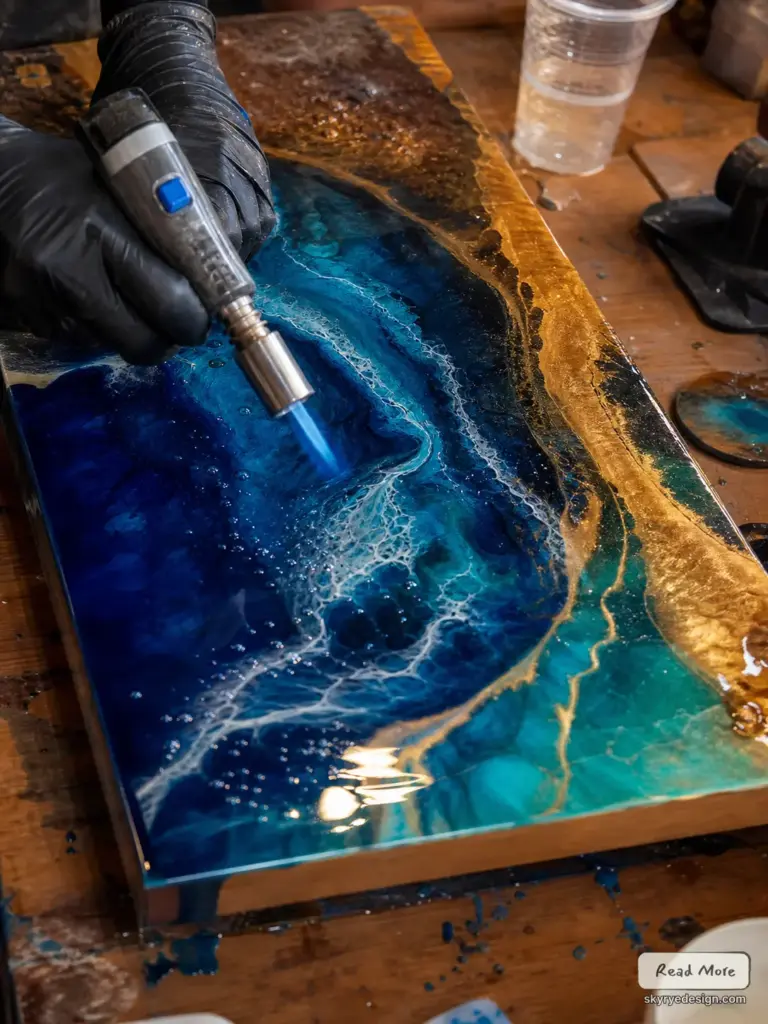
- Butane torch or heat gun: For bubble elimination. The torch is quicker and more accurate for most tasks. The heat gun covers larger areas but offers less control. Most artists utilize both. A standard lighter is ineffective for this.
- Mixing sticks: Wooden stir sticks or silicone spatulas. Silicone is reusable (detaches cleanly after curing), while wood is affordable and disposable. For precise mixing, ensure to scrape the sides and bottom of the cup thoroughly instead of merely stirring the center.

When mixing, stir gently for at least 3 to 4 minutes, scraping the sides and bottom of the cup every 30 seconds. Inadequate mixing is the leading cause of sticky areas and soft spots in cured resin. Rushing is not advantageous here.
What You Can Acquire Later
- Specialized molds: begin with basic round and square silicone molds before investing in intricate shapes. Alcohol inks: beneficial for creating color effects but mica powders and resin pigments are easier for newcomers to manage. Heat-activated glitter and phosphorescent powder: worth experimenting with once you comprehend how your resin interacts with standard colorants. Resin doming tools and precision applicators: useful for jewelry projects but not essential for poured panels and table endeavors.
Safety note: operate in a well-ventilated area regardless of the resin’s VOC classification. Numerous artists wear a respirator with organic vapor cartridges, especially for larger pours or prolonged sessions. The fumes from uncured epoxy are unpleasant to inhale, even with proper ventilation.
Core Techniques: Why the Finest Resin Art Appears as It Does

The Ocean Pour
The ocean pour is the most distinguished resin art style: layers of blue, teal, and white that emulate ocean waves, with organic cell formations at the surface. The cells arise when pigments of varying densities interact at the surface, separating to produce the white foam pattern.

To generate cells consistently: incorporate a small quantity of silicone oil (1 to 3 drops per cup of resin) into your white pigmented layer prior to pouring. Pour white over the tinted layers and tilt the panel. As the layers shift, the silicone creates differences in surface tension that segregate the pigments into cell patterns. A quick pass with a torch expands cells and makes them crisper. Too many passes with the torch close them up again.
Avoid adding silicone oil to every layer, just the white. Silicone in all layers hinders adhesion among them, potentially leading to delamination as the piece cures.
Geode and Crystal Art
Geode resin art imitates the interior of mineral geodes: uneven cavities lined with crystal formations, usually in translucent hues with metallic or white quartz-like edges. The effect is achieved by layering multiple resin pours, adding color and glass glitter or crystal powder in between pours.
The current movement in geode art has shifted towards minimalism. In 2025 and 2026, artists working at the highest level are using a maximum of two colors, opting for simple panel shapes instead of agate outlines, and employing gold ink pens for fine details rather than thick glitter lines. Less color allows the translucent quality of the resin to shine. The technique that frequently differentiates competent geode work from exceptional geode work is the intentional use of white space where the resin cures clear, devoid of pigment.

Craft geode artwork in layers, solidifying each partial pour before proceeding to the next. This approach allows you to manage the form of each colored section accurately instead of having them merge while curing. Most art resins have a working time of 30 to 45 minutes before the mixture starts to thicken, hence organize each segment’s hue and shape prior to resin mixing.
Acrylic Pour on Resin (Messy Pour and Inverted Cup)
Certain creators merge acrylic painting methods with resin, utilizing acrylic pours as the base color and subsequently sealing with a resin finish for shine and safeguarding. The messy pour combines assorted acrylic hues loosely in a single cup and applies them over the surface at once. The inverted cup transfers a mixed cup directly onto the surface.
The resin finish is applied once the acrylic layer is entirely dry, typically after 24 to 48 hours. Avoid applying resin over wet or sticky acrylic — the moisture in acrylic paint can impact the resin’s cure and result in bubbles or fogginess. A thin, uniform resin layer levels itself to create the high-gloss appearance that distinguishes acrylic pour artworks from their uncoated counterparts.
Resin with Additives: Flora, Items, Colorants

Incorporating items in resin is one of its most fascinating applications. Dried flora, coins, natural stones, shells, fabric remnants, and photographs can be encased in transparent resin. The method requires full encapsulation: each item requires resin on every side, not merely underneath, to avoid air pockets that may form around it over time.
For dried flora: ensure they are thoroughly dried before incorporation. Any humidity in the petals will result in cloudiness in the cured resin surrounding them. A 24-hour desiccant treatment prior to embedding is common practice. Fresh flowers cannot be directly encased — they will decay within the resin.
Mica powder colorants create metallic and shimmering effects that alcohol inks and resin dyes cannot. They are blended directly into the resin before application and generate consistent, manageable color. Begin with no more than 6% pigment based on total resin volume — surpassing this may hinder proper curing, especially with solid pigment pastes.
12 Resin Art Endeavors by Complexity

These twelve projects are categorized by the competency they necessitate. The initial four require only minimal tools. The next four introduce more advanced techniques. The final four are serious projects that gain from experience with the earlier ones.
Beginner Endeavors

1. Basic pour coasters: Circular or square silicone molds, one or two colors plus metallic powder. These serve as ideal introductory projects as the small size means minor errors. Cure time is 24 hours, and demolding time is 48 hours. Material cost: under $20 for a set of four coasters.
2. Resin bookmarks: Slim rectangular molds featuring dried flora, pressed leaves, or metallic foil. Clear or slightly tinted resin displays the inclusions optimally. The slender shape allows for quick curing, and demolding is straightforward.

3. Resin keychains: Small molds in various shapes (hearts, circles, geometric patterns). An excellent format for experimenting with alcohol ink swirling methods without committing large amounts of resin.
4. Resin-coated wood slice: Apply clear epoxy over a natural wood slice to seal and gloss it. No mold necessary, minimal coloring required. The wood grain remains visible through the resin with remarkable clarity. Simple yet visually striking.
Intermediate Endeavors

5. Ocean pour panel: A small canvas or wooden panel (8×10 inches works well for practice) with layered blues, teals, and white cells. Requires silicone oil for cell activation and confident torches.
6. Geode panel: A panel in any design with layered hues built up over 2 to 3 pours. Strategically plan the color arrangement before mixing anything. The patience of awaiting partial cures between pours is critical for the success of this project.
7. Resin jewelry (rings and pendants): Small jewelry molds
cast with colored or see-through resin. Smoothing and enhancing the solidified piece to jewelry-quality clarity is a distinct skill from the pour itself. Wet sanding from 400 grit up to 3000 grit, followed by resin polish, yields optically clear finishes.
8. Resin tray with preserved botanicals: A rectangular or oval silicone tray mold with incorporated dried flowers arranged prior to pouring. Requires a light initial layer to secure the flowers in place before fully filling the mold.
Advanced Undertakings

9. River table: A wooden table featuring a resin river flowing between two live-edge wood slabs. Requires deep pour resin, appropriate mold design to prevent leaks, and multiple pours over several days. This is the most technically challenging woodworking-resin hybrid project.
10. Large-format geode painting: A panel measuring 24×36 inches or larger showcasing a complete geode composition. Requires meticulous planning of the full composition before mixing any resin, as the working time is too brief to improvise at this scale.
11. 3D layered ocean scene: Several cured layers creating a three-dimensional underwater panorama featuring diverse elements (fish, coral, sand) at varying depths. Each layer cures clear before the subsequent one is applied. Completing a single piece may take 5 to 7 days.
12. Resin on canvas with mixed media: Blending acrylic painting, resin pours, and physical inclusions (gold leaf, crystal shards, shells) on a large canvas. The challenge lies in integrating multiple materials and techniques into a harmonious composition. This is where resin art ventures into fine art territory.
The Most Frequent Mistakes and How to Resolve Them

Sticky or Soft Areas in Cured Resin
These issues stem from three causes: incorrect mixing proportions, inadequate mixing, or working in chilly conditions. First, verify the ratio, then reassess your mixing method. For a ratio issue: if the piece is only moderately sticky, relocate it to a warmer environment for 24 hours. For significant under-curing: eliminate any liquid resin, sand the surface, and apply a properly measured and mixed fresh coat. It will adhere to the slightly sticky surface below.
Scraping the sides and bottom of the mixing container is the part most newcomers overlook. The resin and hardener tend to separate towards the edges during pouring, meaning any unmixed material sitting at the sides of the cup directly enters your pour. Scrape thoroughly with each pass for the entire mixing duration.
Bubbles That Won’t Disappear
Surface bubbles react to heat. A butane torch positioned 15 to 20 cm above the surface, moved continuously instead of held in one place, pops surface bubbles almost instantly upon application. Avoid keeping the torch over any single area for longer than a second. Charring the surface results in yellowing that doesn’t cure out.
Deep bubbles forming below the surface are more challenging. Warming the resin prior to mixing significantly reduces initial bubble formation. Pouring from a lower height (closer to the surface) introduces fewer bubbles compared to pouring from a height. If deep bubbles surface after pouring, gently dragging a toothpick through the area can bring them up where the torch can eliminate them, but only within the first 30 minutes while the resin remains fluid.
Cloudy or Hazy Finish
Three reasons: moisture exposure during curing, temperature shock, or surface pollution. Humidity exceeding 80% while curing causes the surface to become milky white. Operate in a climate-controlled area during humid months. Temperature shock (for instance, moving a curing piece from a warm room to a cold garage) can induce internal stress that appears as haze.
If the cloudiness is just a surface problem, wet sanding from 800 through 3000 grit, followed by a resin polish (Meguiar’s PlastX or a designated resin polishing compound), restores surface clarity. If the haziness permeates the depth of the piece, it cannot be recovered without stripping and repouring.
Resin That Discolors Over Time
UV yellowing is a legitimate concern with lower-grade epoxy resins. It occurs when UV radiation breaks down the epoxy molecules. Art-specific resins like ArtResin utilize UV and HALS stabilizers to significantly slow this process. Nonetheless, keeping finished resin art out of direct sunlight greatly extends its clarity over time. Any yellowing that has already occurred cannot be reversed, which is why selecting a resin brand is as crucial as the technique.
For items displayed in naturally illuminated rooms, opt for a UV-resistant art resin instead of construction or hardware store epoxy. The price difference is notable (art resins typically range from $30–60 for 32 oz, while hardware epoxy runs at $15–20) but so is the difference in longevity.
2026 Resin Art Trends Worth Noting

Resin art in 2025 and 2026 has transitioned from maximalism to minimalism. The aesthetic evolution occurring in studios and across social media platforms leans towards fewer colors, cleaner designs, and a more intentional use of the material’s inherent properties.
Minimalist Geode
The overly vibrant, five-color geode with thick glitter lines has transitioned to two-color compositions featuring fine gold ink details and intentional negative space. The resin itself, when poured clear without pigment, showcases a stunning translucent depth that saturated pieces obscure. Artists pursuing this direction employ simple panel shapes (square or rectangular) and limit themselves to one primary color and one accent. The outcome is perceived as intentional rather than cluttered.
Functional Resin Art
The trend…
the inclination towards objects that serve a purpose beyond mere wall decor has persisted into 2026. River tables, serving trays, cheese boards, display shelves accented with resin, and jewelry organizers are all prominent segments in the practical resin market. Etsy analytics from late 2025 indicated that functional resin items commanded consistently higher price points than solely ornamental panels of similar dimensions. If you’re contemplating resin art as an additional revenue stream, focusing on functional creations is advisable.
Natural Inclusions and Botanical Conservation
Incorporating preserved moss, dried florals, natural stones, shells, and seeds directly into resin has emerged as a remarkably stable trend over three years. The allure is evident: resin can encapsulate organic materials in pristine clarity, producing pieces that function both as artistic objects and time capsules. Moss terrarium panels, flower preservation paperweights, and jewelry with encapsulated seeds are all noteworthy items in this sector.
Glow-in-the-Dark and UV-Responsive

Phosphorescent powder (glow-in-the-dark) and UV-responsive pigments blended into resin yield creations that appear one way under natural light and entirely different under UV light or in darkness. These are popular in the novelty gift market and complement ocean pour designs where the illumination resembles bioluminescence. The effect necessitates concentrated pigment and is most effective in items featuring some translucent resin areas to allow the glow to be apparent.
Eco-Friendly Materials
Plant-based and bio-derived epoxy resins have been making progress. Brands like Entropy Resins’ Super Sap utilize plant-derived hardeners and lower VOC formulations. These resins don’t completely match the working characteristics of petroleum-based epoxies (they may have shorter working times and demand more careful temperature management), but the disparity has significantly decreased over the last two years. For creators aiming to minimize ecological impact, this has become a viable option instead of a limitation.
Resin has its distinctive surface texture, yet wooden art sculptures like Paul Kaptein’s illustrate how grain, cuts, and voids can convey the concept without using color.
FAQ: Resin Art
How do I begin with resin art?
Commence with small projects, uncomplicated molds, and two colors. Coasters and keychains are ideal first projects because the size is manageable and the material cost is minimal if something goes awry. Acquire a two-part art epoxy from a reputable manufacturer (ArtResin, Entropy Super Sap, or similar), nitrile gloves, silicone molds, and basic pigments. Operate at room temperature in a well-ventilated setting. Review the specific resin instructions for the correct mixing ratio prior to opening any container.
Why is my resin tacky after curing?
Tacky resin generally results from improper mixing: incorrect ratio, inadequate mixing time, or not scraping the sides of the mixing vessel. Relocate the sticky piece to a warmer space for 24 hours first, in case temperature is the issue. If it remains sticky, remove any liquid resin, lightly sand the surface, and apply a fresh properly mixed coat. The new coat adheres to the under-cured layer and cures appropriately on top of it.
How long does resin require to cure?
Surface-dry (touch without sticking): 24 hours for most art resins. Safe for demolding: at least 48 hours, 72 hours for caution. Fully cured and food-safe: 72 hours. Deep pour resins take longer: 48 hours to touch-dry, 5 to 7 days for complete cure in thick castings. Temperature significantly influences these times. At 15°C, anticipate cure durations to roughly double.
Can I utilize resin art outdoors?
Completed resin art can be utilized outside with certain precautions. UV exposure deteriorates most epoxy resins, leading to yellowing over months to years. For outdoor items, utilize a UV-resistant marine-grade epoxy or a UV-blocking sealer over the finished piece. Consider that thermal expansion from temperature shifts can lead to delamination on panels with wooden substrates if the bond isn’t secure. Fully enclosed, well-bonded pieces endure outdoor conditions significantly better than poured panels.
What can I incorporate into resin to achieve color?
Mica powder pigments: metallic and pearlescent effects, easiest to manage. Alcohol inks: translucent, vibrant effects that generate organic swirling patterns. Resin pigment pastes: opaque or semi-opaque colors, strong and dependable. Acrylic paint: functional but can impact cure if excessively used (water content). Avoid watercolor, food coloring, or oil-based paints. Keep total colorant volume below 6% of the resin mixture to prevent affecting the curing process.
How do I eliminate bubbles from resin?
A butane torch positioned 15 to 20 cm above the surface, moved continuously. Quick passes are more effective than keeping the torch stationary. For deep bubbles in the mixture before pouring, warm the resin containers in warm water for 5 to 10 minutes prior to mixing. Pour from a low height to reduce air introduction. Operate at the suggested temperature range (21 to 24°C) for the smoothest bubble-free result. Inspect the surface every 10 to 15 minutes during the initial hour and torch any new bubbles that may arise.
Is resin art safe to create at home?
Yes, with appropriate precautions. Wear nitrile gloves whenever handling uncured resin. Work in a well-ventilated area, ideally with a window open or a fan operating. Use a respirator with organic vapor cartridges for prolonged sessions or large pours. Discard cured resin remnants as solid waste (once cured, resin is inert and non-hazardous). Liquid uncured resin is a skin sensitizer: repeated skin contact without protection can induce allergic reactions that worsen with successive exposures.
Initiating Your First Pour
The piece in my garage remains there. I could have remedied it at any phase: a second pour over the sticky area, sanding the cloudy section, warming the workspace beforehand. I lacked the knowledge to fix it then. Now I do.
Every resin artist has a tale of failure. The valuable ones are those where you pinpoint exactly what caused the issue, not merely that the issue occurred. Document your ratio, mixing time, room temperature, and working duration for every pour. When something goes amiss, that record indicates which variable to adjust.
Start with coasters. Pour two simultaneously so you can explore variables between them. Get accustomed to the material’s working time before attempting anything that necessitates precise timing. The first five pours impart more knowledge than ten articles. The craft values patience over haste, and observation over assumption.